Pages

Showing posts with label tutorial. Show all posts

Friday, December 23, 2011

gold + gift wrap

This tutorial has such pretty results, I couldn't not share!


All photos and tutorial © 100 Layer Cake.

Thursday, March 31, 2011

Harry and Hermione

I love the soundtrack "Harry and Hermione" from the Half-Blood Prince, it's so other-worldly... I can't wait to learn how to play it!! Here is an awesome tutorial I found:


Do you like to listen to soundtracks, too? :)

Sunday, May 9, 2010

Winter blooms and birds

I can't wait to get some lovely pastel shades of crepe paper and make these fabulous flowers! They would totally brighten up my room! 

Edit: Wouldn't these make a fun bouquet for your mum?!


And these sweet bird cages!


There are a lot of other DIYs on The Bride's Cafe [which is where these tutorials are], and I really like the moss initials!

Thursday, April 22, 2010

Firsts..

I'd written the first welcoming post here in October 2008. Then, after a gap, I really started writing in this blog. On April 22nd last year. It was my clips tutorial post, written for my best friend. I'd only started this blog for my bestie, to let her know what I'd been up to... but then - and I love this part! - others joined in, like Stephanie, Abby, Brajesh [who I would've never dreamed of reading this blog! He's all futbol and running around], Rachel, Sam, Robert, Silviana, Rashmi, Ruthie, Maia, Marinho, Kunal, DT, Akshay, Karishma, Quinn, Laxmy, Devil, Kitty Cheese, and last but definitely not the least, Jingle! Yay! Thanks all!! :D

And here's another first. My first-ever photograph taken in the flash-as studios we've got up at university:


Please don't just take that photo away, ask me first. :)

Thursday, April 1, 2010

Easter!

Yay for the Easter break! Here's a nice Easter wreath tutorial that I stumbled upon earlier today, if you're interested. 

Okay. Half-way through writing that, I remembered: Today's April Fools Day! And ... it's 8:30pm! Damn!!

So I whipped up this easy prank:

Dried-up blood and wound:

Take some glue. The kind you get in sticks. I used Amos Baton de Colle. It's quite a soft glue. Scrape a bit off, and apply it to wherever you want the wound to be. Paint over it with a red gel pen/pilot pen/whatever you want. I used a vivid [a permanent marker] because I was in a great rush, but I'm not sure how it's going to come off now! So think before you paint :P

It's awesome how glue looks just like dried up blood. I did mine on my palm [it was "a cut from a blade!"]. And yes, if you are wondering, my little trick did work, though I think the person who I was tricking was a tad annoyed. Okay, maybe more than tad. But that's because my "wound" was huge and pretty awful-looking. Hahaha ...

By the way, someone from school taught me this four years ago :D

Also. It's George [and Fred *sob*] Weasley's birthday today! Happy Birthday to the master pranksters!

PS: This post was only supposed to be about Easter and eggs and such. But one thing led to another ... ha ha ha ... funny how that happens!

Edit: The time down here ↡ lies.

Tuesday, March 30, 2010

Make a corsage brooch!

Corsage brooches were quite the hype this summer! They look stunning on a simple white tee shirt! I bought two, made four, and got given two. I might post a picture of all my brooches later.

Today, boys and girls, we're going to be making this:


Okay, so let's get started:

You will need:
- Tulle [in any colour!]
- Some thick cardboard [It's okay to recycle some, I got mine from a university project!]
- Scissors and strong glue [the basics..]
- A circle template for the centre of the brooch [or anything circular that you can draw around! I used the base of a paint bottle earlier]
- Some jewellery findings, and brooch pins


How to make it:

1. Cut out a circle from the cardboard - it can be as big or small as you want it to be! Mine was about 3-3.5cms in diameter. Cut out a circle from within it, like this:


I also coloured it black because my tulle was black, but this isn't strictly necessary because in the end your tulle completely covers the cardboard base, so it's not seen.

2. Time to cut your tulle! Cut it in long strips, about 1cm by 15cms. But you can make it wider, shorter, or longer! And don't worry about cutting it extremely perfect - no one will be able to see.


3. Now get knotting! Get a strip of tulle, and hold it in a upside-down U shape over the circle cutout. Like this:


4. Then take the two bits that are loose and pull them up from under the circle and through top loop of the upside-down U.


5. Pull the loose bits tight ... tighter!


6. Repeat this with the rest of the strips. One thing to keep in mind: Keep tightening those strips together. After you think you're almost done covering the circle, push it in and create space for more. This will make it sturdier and make the brooch look fuller.


7. Done yet? Just a little more to go!

8. Stick a jewellery finding in the middle of the circle, and a brooch pin on the other side. [Make another circle, cover it with fabric and stick the brooch pin on it. I've also shown that in this tutorial]

The final brooches!


9. Yay! Your super cool corsage brooch is done! Wasn't that easy? Aaaand, doesn't it look similar to this one Emma wears for Teen Vogue?!


Extra notes:
- Instead of using a jewellery finding, you could also make a smaller version of the brooch and stick it in the middle, like how I did it here.

- After you make the brooch, you might want to snip uneven ends, if any. Or you could purposely make it uneven! :) [I should try that!]

- This brooch was inspired by DesignMom's Tulle Tutorial.

- This brooch, before any glue was applied, went through the washing machine. It came out good as new, and nothing happened to the cardboard inside. Phew. No guarantee what happens after the gluing, though! :)


Let me know if any of you makes one! Or if you find out about any other broochey tutorials!!

Oooh, and don't forget to buzzback/comment!!!

Emma's photo © Teen Vogue; all the others are my own.

Tuesday, March 23, 2010

Anthropologie Bottle Art

Wow, take a look at this amazing article on Anthropologie's window display - made out of cut plastic bottles! Such a cool project!

Kandee Johnson, one of my most favourite bloggers, also talks about the display here. Do check out her amazing channel on youtube, where she shows heaps of make-up and dress up tutorials and tips! Yay for free online tutorials :D

Edit: I was writing this post, and the power went off. Thank goodness for sweet "Save As Draft" mode!!
Got that image from Kandee's blog, I'm sure it's © Anthropologie :D I only intend to use it for illustrative purposes.

Thursday, December 3, 2009

Brooches and Shopping Losts

Quite a strange title, no? Not to worry, you'll find out about it in a minute ...

So, first up, this is me wearing the corsage brooch I made. I was wearing dark blue jeans, a grey t-shirt with a black vest - quite a neutral outfit, if you ask me. The brooch just livened it all up.

Next, is a lovely blog find. Shopping Losts. Wherein you turn in shopping lists that you have found, and in exchange they "turn it into something to be treasured".

ps: I Am Sam. I watched. I cried. I loved it. I think everyone should watch it ... 

Tuesday, December 1, 2009

Tutorial - easy corsage brooch

My first-ever tutorial! Don't forget to click on the images to see them better!

Yup, these are the flowers that I bought the other day at Spotlight. If you want an extra challenge, you can of course make them yourself. [I'm also going to be doing a tutorial on making a brooch from scratch :) ]

Oh, and I'd tied a knot to the stem just to make sure the petals didn't come undone.
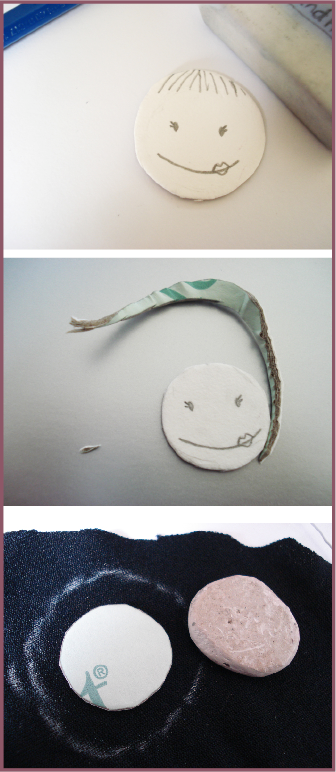
To make it extra sturdy, I cut a cardboard circle, chalked a bigger sized circle on a piece of black fabric, and stuck the fabric on the cardboard. 

Snip the flower stem, stick the base that you just made, and attach a brooch pin with strong glue. Leave the brooch to dry! Mine is still drying. :)

And voila! Super cute corsage brooches!!

Sunday, May 3, 2009

Old-fashioned Blueberry Pie

Here's the recipe for the old fashioned blueberry pie that I prepared earlier:

The Ingredients for the Pie:


Filling:
- 3 tbsp berry jam
- 3 cups blueberries
- 1 tsp cinnamon
- 1/4 cup sugar


Pastry: Edmonds shortbread pastry sheets

The Making of the Pie:

Filling:
Heat jam until liquid, then stir in the remaining ingredients until the blueberries become soft [if they're frozen], and are evenly coated with sauce.


Assemble:


- Line a pie dish with pastry. Make sure that the pastry overlaps over the edge by 2 cms.
- Pour the filling into the pie dish.
- Arrange a lattice pattern such as this over the top of the filling.
- Fold over the remaining 2 cms of pastry sheet over the lattice.
- Bake at 210 degree celsius until the pastry is golden brown.
- Serve warm, and let me know how it went :D


Points to remember:
- I used the shortbread pastry. It gets soggy easily. So don't leave it uneaten for too long.
- For the berry jam, I used blueberry jam. It was delish. Way too sweet for me though.
- The pie dish was just a normal aluminium foil dish that you can get at your supermarket for about 50c.
- I read somewhere that the pie needs to be in the oven for 20 minutes. Ours cooked in about 15.
- Leftover pastry sheets? I cut out shapes, chucked them in the oven with the pie, and they turned out to be beautiful and very very delicious biscuits to go with tea. Also delicious raw! :D
- With the leftover pastry sheets, I cut some circles out of them and stuck them on top of the lattice. They looked good.

All of these are photographs that I've taken myself, if you want to use them for your assignments or any other purposes, please contact me first!

Wednesday, April 22, 2009

A matter of clips ...

So, I recently got a haircut and decided to look for funky but decent hairpins to go with it. I saw only one pair that I liked, and that was $2 per clip. All it had on it was metal roses! So I decided to make some pins of my own. It turned out to be really easy, it wasn't expensive, I had lots of fun doing it, you can also do it with your friends/kids as a holiday project, the pins can be a really good birthday gift ... and most of all, I had the satisfaction that I made them myself.

1. I bought some ribbon from the local artstore with bobble-like things on them. 50c per half meter, each containing about 30 to 50 bobbles, so that makes that many clips!


This luckily goes with one of my shirts!


2. Then I cut the individual bobbles out ...


3. This is my buddy, super glue. Even though it wasn't that nice when I got it on my fingers! :D


4. Woohoo! Cute clips!